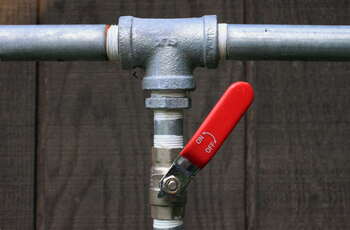
Whether you’re tackling a plumbing project as a DIY enthusiast or looking to enhance your home improvement skills, learning how to install a shut-off valve on a copper pipe is a valuable skill. Shut-off valves provide a convenient way to control water flow to specific fixtures or appliances, allowing for maintenance or repairs without disrupting the entire water supply. In this comprehensive guide, we’ll walk you through the step-by-step process of installing a shut-off valve on a copper pipe, empowering you to take control of your plumbing projects.
Understanding Shut-Off Valves
Before diving into the installation process, let’s familiarize ourselves with shut-off valves and their types:
- Compression Valve:
- Features a threaded nut that compresses a brass or plastic ring onto the copper pipe, creating a watertight seal.
- Suitable for DIY installations, providing a tight connection without soldering.
- Sweat Valve:
- Requires soldering to create a secure connection between the valve and copper pipe.
- Ideal for situations where a watertight seal is crucial, such as behind walls or in concealed spaces.
Tools and Materials Needed
- Adjustable wrench

- Pipe cutter or tubing cutter
- Emery cloth or sandpaper
- Flux and solder (for sweat valve)
- Propane torch (for sweat valve)
- Teflon tape (for compression valve)
- Plumber’s tape measure
- Shut-off valve (compression or sweat valve, depending on preference)
- Bucket or towel (to catch any residual water)
Step-by-Step Guide for Installing a Shut-Off Valve on Copper Pipe
For Compression Valve
- Turn Off the Water Supply:
- Locate the main water shut-off valve for your home and turn it off. Open a nearby faucet to release any remaining water pressure in the pipes.
- Measure and Mark:
- Measure and mark the section of the copper pipe where you intend to install the shut-off valve. Ensure there’s enough space around the pipe to accommodate the valve.
- Cut the Copper Pipe:
- Use a pipe cutter to make a clean and straight cut on the marked section of the copper pipe. Rotate the cutter around the pipe, tightening it after each rotation until the cut is complete.
- Deburr and Clean:
- Use emery cloth or sandpaper to remove any burrs or rough edges from the cut end of the copper pipe. Clean the surface to ensure a smooth connection.
- Attach the Valve:
- Slide the compression nut and ferrule onto the copper pipe, followed by the shut-off valve. Ensure the valve is oriented correctly with the handle facing outward for easy operation.
- Tighten the Compression Nut:
- Hand-tighten the compression nut onto the shut-off valve, and then use an adjustable wrench to secure it further. Be cautious not to overtighten, as it may damage the compression fitting.
- Check for Leaks:
- Turn on the main water supply and check for leaks around the compression fitting. If any leaks are detected, tighten the compression nut slightly until the leaks stop.
- Test the Valve:
- Turn the shut-off valve handle to the closed position and check if water flow stops at the connected fixture. Test the valve in the open position to ensure smooth water flow.
For Sweat Valve
- Turn Off the Water Supply:
- Follow the same steps as above to turn off the main water supply and release any remaining water pressure.
- Measure and Mark:
- Measure and mark the section of the copper pipe where you’ll install the shut-off valve. Ensure there’s adequate space around the pipe for the valve.
- Cut the Copper Pipe:
- Use a pipe cutter to make a clean and straight cut on the marked section of the copper pipe. Rotate the cutter around the pipe until the cut is complete.
- Deburr and Clean:
- Use emery cloth or sandpaper to remove burrs and clean the cut end of the copper pipe thoroughly.
- Apply Flux:
- Apply a thin layer of flux to both the inside of the shut-off valve and the cleaned end of the copper pipe. Flux ensures a clean and secure soldered connection.
- Assemble the Joint:
- Insert the shut-off valve onto the copper pipe, ensuring a snug fit. The flux should help create a watertight seal during soldering.
- Solder the Joint:
- Use a propane torch to heat the joint evenly. Once the copper reaches the right temperature, apply solder around the joint, allowing it to melt and flow into the connection. Ensure a complete and smooth soldered joint.
- Cool and Wipe:
- Allow the soldered joint to cool naturally. Once cool, wipe away any excess flux with a clean cloth.
- Check for Leaks:
- Turn on the main water supply and check for leaks around the soldered joint. If leaks are present, the soldering may not have been complete or uniform. Repeat the soldering process if necessary.
- Test the Valve:
- Turn the shut-off valve handle to the closed position and check if water flow stops at the connected fixture. Test the valve in the open position to ensure proper functionality.
Tips and Precautions
- Safety First:
- When using a propane torch for soldering, follow safety precautions, including wearing protective gear and working in a well-ventilated area.
- Correct Soldering Temperature:
- Achieving the correct temperature during soldering is crucial. The copper pipe and shut-off valve should be hot enough to melt the solder but not excessively so.
- Use Teflon Tape Sparingly:
- When using a compression valve, apply Teflon tape to the threads on the shut-off valve sparingly. Excessive tape can lead to difficulty tightening the compression nut.
- Double-Check Measurements:
- Accurate measurements ensure that the shut-off valve fits securely on the copper pipe. Double-check your measurements before cutting.
- Regular Maintenance:
- Periodically check shut-off valves for any signs of wear or leaks. Replace valves that show signs of deterioration.
Conclusion
Installing a shut-off valve on a copper pipe is a manageable task for DIY enthusiasts and can save both time and money when dealing with plumbing projects. Whether you opt for a compression or sweat valve, following the step-by-step guide, using the right tools and materials, and adhering to safety precautions will help you achieve a successful installation. Mastering this skill empowers homeowners to take control of their plumbing, ensuring efficient water flow and facilitating future maintenance or repairs with ease.


